Showing posts with label kids. Show all posts

Sunday, November 27, 2011

Magnetic Nativity Project - Easy and Fun

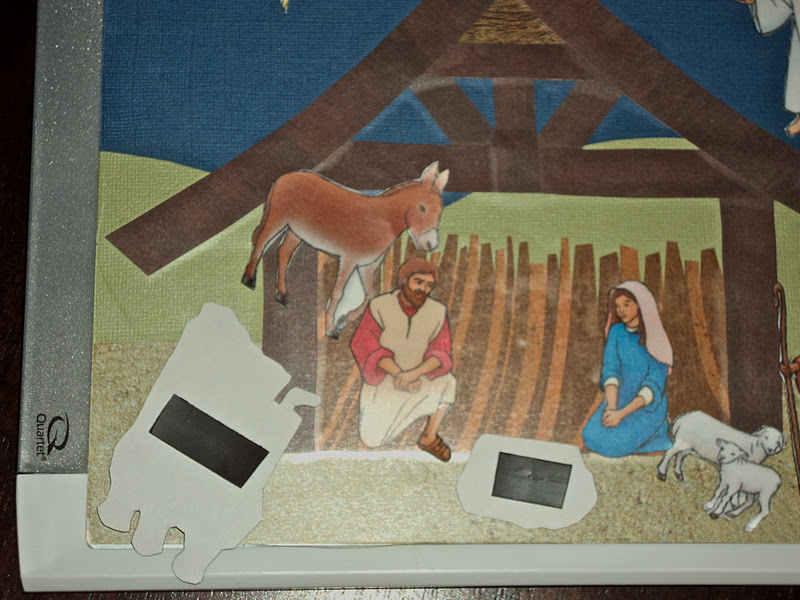
I wanted a nativity that Eden could play with and that would be durable, portable, and easy. This is what I came up with:

I bought this small (probably 6"x8") whiteboard for under $3:

Then, using craft paper I already had I made the background (blue sky, green hills, sandy ground):

I just used double stick tape to put it onto the whiteboard:

Again, using craft paper I already had, I made this simple stable. You could simplify it even more by leaving off the rafters:

Next I printed off these images. They can be found here. Then I covered the images with contact paper and cut them out:

I covered the stable/background with contact paper and placed magnetic tape (that I already had) on the back of the nativity images:

My total cost for this project (excluding items I already had) was less than $3. If I had purchased the magnetic tape and craft paper it still would have come in under $5. I have given some of these as gifts (and plan to do some more). Eden took hers to church last week and it was a great quiet Christ-centered activity for her to do during the talks.

Friday, October 15, 2010

Helpful Hint: Getting the Medicine Down

Eden has had a respiratory infection this week. She is on antibiotics but she has no idea. How have I gotten her to willingly drink down her medicine without even realizing it?

Well, let me tell you!

Eden's grandpa (my dad) likes to make and drink Crystal Light. Because it is tart and makes him pucker, he calls it "Kissing Juice." Obviously, this name makes Crystal Light even more appealing to his grandkids. Eden begs to get Kissing Juice but that stuff isn't cheap (not to mention that all those chemicals aren't exactly healthy). So, the compromise is this: Eden gets to have one cup of Kissing Juice each day. She thinks it is a real treat!

What she doesn't know is that this week her "Kissing Juice" has really been medicine + water. She thinks it is amazing that I'm suddenly allowing her (insisting, really) to have Kissing Juice morning AND night.

So far it has worked like a charm.

Friday, August 14, 2009

Matching Purses


For this project I used a pair of Eden's old pants. I used one leg (that had some cute embellishments on it) to make a purse for her Baby-doll. I used the top part of the pants to make a purse with pockets for Eden. Voila! Matching Purses!

We've been on vacation for a while and I really missed my sewing machines. There is much "catching up" to do at home so I won't be taking on any big projects for a while but it just felt really good to do a little sewing. Eden loves these bags and thinks it is so fun to have matching purses with her Baby-doll.

It is SO good to be home!

Tuesday, July 7, 2009

Tutorial Tuesday - Strap Covers

Does your child get tired of having the carseat or seatbelt strap rubbing against her soft skin? Mine did so I decided to make a faux fur strap cover.

Eden LOVES these and thanked me every day for a week. She kept saying, "mommy made it for Eden, thank you mommy." Now if that isn't reason enough to do a VERY LITTLE bit of sewing, I don't know what is.


Do you want to make one?
Here we go:

Materials:
  • Scissors
  • Measuring Tape
  • Faux Fur (1/8 to 1/4 yard)
  • Thread
  • Sewing Machine
  • Velcro Strip
Instructions:
1. Measure the width of your strap to be covered multiplied by two then add the width of your velcro plus .25 inch. (So, if your strap is 2.5 inches and your velcro is .75 inch you would have 5.75 inch plus .25 inch brings your total to 6 inches).

2. Measure the length you want your covers to be (I recommend at least 3 inches)

3. Cut 2 pieces of your fake fur to your measurements. (For the examples above you would cut them 6" x 3".)

4. Measure and cut two pieces of velcro to fit the length of your strap cover (in our example: 3 inches)
5. Pin the velcro on to the fur. Make sure one of the velcro strips is on the "right" side and the other strip on the "wrong" side of the fur. Like this:
6. Sew the velcro into place using a straight stitch on each side of the velcro or a large zig zag down the middle of the velcro.
7. Remove the pins, put it on the strap and enjoy your child's gratitude.

Tuesday, June 30, 2009

Tutorial Tuesday - Child's Purse

Eden loves bags and purses and such. I thought this fabric would make a cute one (it is leftover from the diaper changing pad).

What do you think?

Materials:

  • Sturdy fabric (I used canvas) 16" x 12"
  • Decorative fabric (I just used this cute lady bug cotton) 12" x 12"
  • Scissors
  • Thread
  • Strong Ribbon (for handles)
  • Measuring tool (ruler or tape or whatever)
  • Pins
  • Velcro or other fastener (optional)
First of all, cut out your fabric. The black is 16" x 12" and the lady bug fabric is 12" x 12" (in order to make the lady bugs right side up on both sides of the purse I cut two pieces and then stitched them together as seen below - if you have a pattern that doesn't have a right side up you can just cut one piece of fabric):

Fold each piece in half and iron:
The crease will be your sewing line:
Fold both pieces of fabric the other direction and iron again:
Hem your top fabric (my lady bugs) on both the top and bottom (but not sides).

Line up your folds so that the larger piece (my black) is underneath right side up and the designer fabric (lady bugs) is on top also right side up. Pin along the creases and then sew:
I used a zig zag to sew my seams:
Now, put right sides together (your fabric has become one piece now) and sew the two sides. You just created a bag with front and back pockets.

Turn the (black) fabric inside and sew around it (creating a hem for the top of your purse).
Turn the bag inside out and take the bottom points and match the bottom seam with the side seam so it forms a triangle like this:
Sew a seam approximately 1.5 inches in from the point of the triangle - repeat for the other side. Now your bag has a flat bottom.
Sew your straps onto the bag (I did a decorative zig zag on my straps to continue the decorative look). To sew the straps, I do a box seam - I sew about 8 stitches then pivot and sew 8 stitches down, pivot, 8 stitches across, pivot, 8 stitches up. It makes a nice secure seam that also looks nice (I used black so it didn't compete with my red thread).
I chose to sew velcro onto the two sides of my purse so that Eden can fasten it and keep her stuff from falling out. You could do a button or a hook or nothing at all:
The end.

Tuesday, June 16, 2009

Tutorial Tuesday - Ruffled Skirt from Pants or Shorts

Eden has hit that stage when she just wants to wear skirts all the time. Forget dresses or even pants, she could live in a skirt. The problem? She only has one. So, I thought it would be fun to make her some skirts.

When looking through her clothes, I found a pair of shorts that someone gave us. She has TONS of shorts and I thought these would be a good beginning to a really cute skirt. I had bought some fabric on sale and realized it would actually match.

Voila!

This is what I came up with (without buying anything new - I love that!)
Do you want to make one too? Come on, you KNOW you do!

Here is what you'll need:

  • A pair of shorts or pants that fit your child in the waist and bum
  • 1/4 to 1/2 yard of fabric
  • Thread
  • Measuring Tape
  • Scissors
  • Embellishments (ribbon, buttons, whatever)
  • Sewing Machine
Project Time: approximately 30-45 minutes (if you have done some sewing and know how to baste or gather, a bit longer for a beginner)


Start out by cutting the shorts or pants above the crotch (you can measure your child down from the waist and determine how long you want this part of the skirt to be).


Next, measure the fabric for the rest of the length of the skirt (however long you want your skirt to be minus however long the cut off shorts are plus a one-inch seam allowance).

Now, cut the full width of the fabric (45") at that length.
Now, finish the edge of both your shorts and the fabric (I used my serger but you can zig zag on your sewing machine if you don't have a serger).
Next, connect your fabric by sewing the two "short" edges together (right sides together - so the seam is on the "inside").

Now baste along the finished edge of the fabric. This is so that you can pull the thread to create a gathered ruffle. You'll want to set your stitch length to a high number (I did 4.5). A longer stitch length makes gathering easier.

Now, gather your fabric by pulling on one thread. If you want a more detailed tutorial on gathering, see here.
Once you have your fabric gathered to the right length (to fit your top piece), pin it (right sides facing) to the top piece and then sew into place (don't forget to move your stitch length to normal).
Now hem the bottom (hint: I used the finished edge of my fabric and so I didn't have to hem). You may embellish with ribbon or whatever and you are done!

Tuesday, June 9, 2009

Tutorial Tuesday - Reusable Coloring Pages


This is a REAL simple tutorial.

What you'll need:
Printed Coloring Pages*
Card Stock
Scissors
Glue
Laminate


All you do is
  1. Print out coloring pages.
  2. Glue coloring pages to each side of the card stock.
  3. Laminate.

Let your child color with regular crayons.

Wipe the crayon away with a tissue or cloth.

Color again.

Rinse, repeat.

I told you this was easy!

*I printed the coloring pages from the new nursery manual. You can find them here. Click on the right picture column (there are usually two pictures, a painting or photo and then a coloring page, the coloring page is usually the one to the right). These are what I take to supposedly entertain Eden during Sacrament Meeting. It doesn't always work. Eden doesn't understand why she shouldn't provide commentary through Sacrament Meeting the way she does the rest of her life. I'm so glad that I encouraged her to have good verbal skills by giving her a running commentary for the first year of her life. Now I will spend the next many years listening to her running commentary. Smart, I am.

Tuesday, June 2, 2009

Tutorial Tuesday - Dressing Cube

I wanted to have some fun toy to help Eden learn her "dressing" skills. After looking online for different toys I came up with the idea to create my own dressing cube. There are lots of tutorials out there to help you make a block so I won't be redundant. You can look here or here or here for that.

So, now that you've looked over those tutorials and understand how to make a cube (or block) I will show you how I made a dressing cube.

1. I made a list of the skills I wanted to teach: zipper, buttons, snaps, tie, velcro, etc.

2. I cut out 6 squares (mine are 9 inches squared) using a canvas black fabric I just had on hand.

3. I looked through old clothes (hers and mine) for items that could be repurposed.

4. I found this fleece jacket with HUGE buttons. Eden loved this jacket last fall but it is too small now. I cut out the middle section then pinned it to one square. I sewed a seam on each side (so the middle is still open unless buttoned shut.
5. I found this pair of pants that were well-worn but that have a button, zipper, and tie. It also has great pockets so that was an added bonus. I cut out the section I wanted to use and sewed it onto one of the canvas squares. It is sewn on the bottom and along the sides but the top is open.6. I found this shirt of mine that was well-worn and headed for the garbage. It has a great zipper - I especially like the pull on the zipper. I cut out the section I wanted and serged (you could zig zag) around it so it wouldn't fray. Then I sewed it on one of the canvas squares.
7. For the velcro pieces I decided to use felt and cut out my daughter's initials. I first made a pattern for the letters.

8. Next, I sewed the scratchy side of the velcro onto the "extremities" of the letters.
9. I did a zig zag around the part of the letter that would be open and then I pinned the "base" onto my canvas squares. I zig zagged the base on so it was secure. Then I sewed the soft side of Velcro on to the right spots on the canvas square. The picture below shows how the stem of the K (the straight line) is secured to the square while the arm and leg are loose unless fastened with the velcro. (The reason you want to put the scratchy side on the felt is because if it is on the square, it will snag the felt and create problems.)
10. For the last square I needed to present snaps. I thought it would be fun to make some flowers and so I made some yo yos (see tutorials here, here, or here) and fastened some ribbon to them and then one part of the snap on the back. Then I cut out some felt grass and sewed it on to the canvas square - leaving the top part open (forming a pocket of sorts). Then I fastened the other end of the ribbon (stem) inside the pocket. Finally, I sewed the other part of the snap onto the canvas square in the appropriate places. This makes a cute little flower garden. The flowers can be inside the grass pocket and then "grow" up and be snapped into place.


Here is a picture of the final block. Eden is quite proud of it and is learning her dressing skills.


Let me know if you have any questions. Also leave suggestions for how this can be adapted. Have fun!

Tuesday, May 26, 2009

Tutorial Tuesday - Musical Squares

If you have a laminator (or access to one)
and if you have a toddler or preschooler (and therefore not much time), then
this is a project for
you!


Materials List:
  • Several (you determine the number) pieces of cardstock cut to squares (approx. 6" x 6")
  • Glue
  • Desired Images (found on the internet, made by yourself, cut out of a magazine, etc.)
  • Laminator
  • Source of Music
  • Scissors
Instructions:
  1. Decide what you want to teach your child.
  2. Find images that will meet your need (shapes, letters, numbers, colors, etc. - see suggestions below).
  3. Cut cardstock to squares.
  4. Glue images to cardstock. (Suggestion: use both sides, I did shapes on one side and vowels on the other thereby getting two games out of one.)
  5. Laminate cards.
  6. Trim laminate as needed.
  7. Turn on the music.
  8. Dance.
  9. Stop the music and call out an image (e.g. "Triangle!") and watch your toddlers scramble to find the right card to stand on.
  10. Repeat steps 7-9 until everyone is tired and ready for a nap.

I know, it sounds simple but toddlers LOVE it and it is a great way to teach. Depending on what you are trying to teach your child, you can put various images* on the game pieces. You can find free clip art online by simply doing a search such as "triangle clip art" and then click on "images" when the results pop up.

*Some Ideas for different types of cards:
  • Alphabet Cards
  • Various Animal Cards
  • Number Cards
  • Shape Cards
  • Color Cards
  • Scripture Cards (images from different scripture stories)
  • My Family Cards (pictures of different family members: aunts, uncles, cousins, etc.)
  • Simple Word Cards (CAT, DOG, HAT, etc. - you could include an image of the item too)
Another variation is to layer your images so that you have a yellow card with a cat and a "C" on it. That way you can call out the color, the animal, or the letter.

Be creative and share your ideas in the comment section.

P.S. Any wonderful suggestions for how I can clean up that fireplace (seen in the video)? We haven't used it and it is driving me nuts!

Thursday, April 2, 2009

Internet Romance

I found a new site that I think I may want to start dating. I don't think I'm ready for an exclusive relationship with it, but we will definitely be hanging out!

Check it out here!