Wednesday, February 19, 2014

Dinner in a Pot: Kale & Tortellini Soup

In a large sauce pan add:

2 C Chicken Broth
1/2 C Cooked, Cubed Chicken
1/2 C Cubed Ham
1 1/2 C Uncooked Cheese Tortellini
Garlic to taste (1-3 cloves)
Thyme to taste (1/2 t)
Celery Salt to taste (1/2 t)

Place on stove and cook until it begins to boil, turn down to a simmer and add:

4 oz Cream Cheese

Cook until the tortellini is soft then add:

1/2 C Milk
1/2 C Chopped Spinach
1 C Pieces of Kale

Cook until the Kale is bright green and the Spinach is wilted.

Serve with fresh croutons!


Tuesday, February 4, 2014

Cranberry-BBQ Chicken

I've seen many versions of this, but here is my own take on the Cranberry-BBQ Chicken:

3 Large Skinless/Boneless Chicken Breasts
1 Can (14 oz) Whole-berry Cranberry Sauce
1/2 C BBQ Sauce of your choice
1/3 C Dried or 1/2 C Fresh Diced Onions
1 t Diced Garlic
1/4 t Five Spice (an Asian spice that is found in most grocery stores in the spice aisle)
1/4 t Dried Basil Flakes
1/8 t Red Pepper Powder
Salt and Black Pepper to taste

In a medium bowl mix all the ingredients except chicken breasts.

Put frozen chicken and sauce mixture in a crockpot. Cook: 4-5 hours on high or 6-8 hours on low.

After the chicken has begun to thaw/cook, pull it out and slice each breast into 4-5 pieces. Return to crockpot for remaining time.

Serve with baked potato or shred the chicken and serve over a bun.

This recipe can be prepared in advance and then frozen: mix sauce as directed, put chicken breasts in freezer bags, pour sauce over the chicken, freeze. The night before you plan to cook it, take a bag from the freezer and thaw it out in the refrigerator. Cook as directed (times can be lowered an hour with thawed chicken).

Friday, June 22, 2012

Make It Quick Pizza Crust

If you are like me, you like to make your own pizza but don't think about it until 5pm and at that point it is easier to make something else or pick up the phone. I've tried other "quick" dough recipes but they haven't wowed me. Either they are too heavy or don't really have the right texture. Then I tried this.


  • 1 T Instant Dry Yeast (I use Fleishmann's)
  • 1 C Warm Water, with a squeeze of honey dissolved in it
  • 1 C Wheat Flour
  • 1 1/2 C White Flour
  • 2 T Olive Oil
  • 1 t Salt


  1. Dissolve the honey in the warm water and then add the yeast. I use my glass measuring cup for this (the 2 C one works great). Set aside and watch it ferment.
  2. Put the yeast in your mixer (or a large bowl).
  3. Add the flour, oil, and salt.
  4. Mix until everything is moist. Don't mix too much or you'll over-activate the gluten and your dough will be too rubbery and hard to spread.
  5. Let the dough sit 10 minutes (not bad considering most recipes call for two hours!)
  6. Form dough into your pan, top with your favorite toppings and cook as directed in your recipe or at 425f for about 15 minutes.
Yield: Two Medium Pizzas (8 slices each)
Nutritional Facts per Serving:
(these stats are for the crust only, you'll need to calculate your toppings)
Calories: 78
Fat: 2g
Cholesterol: 0mg
Sodium: .4mg
Potassium: 45.6mg
Carbs: 14g
Fiber 1.1g
Sugars: .5g
Protein: 2.2g

Monday, March 5, 2012

Mushroom-Marsala Skillet Chicken

This recipe comes from Good Housekeeping Fast Weeknight Favorites
  • 4 medium skinless boneless chicken breast halves (1 1/4 lbs)
  • 1/2 t salt
  • 1/8 t ground black pepper
  • 1 T olive oil
  • 10 oz sliced mushrooms
  • 1 large shallot, finely chopped
  • 1/2 C reduced-sodium chicken broth
  • 1/2 C Marsala wine
  • 2 T chopped fresh parsley


  1. Cut chicken into pieces (approximately 2 inches). Sprinkle with 1/4 t salt and pepper.
  2. In nonstick skillet, heat oil over medium heat until hot. Add chicken breasts and cook, turning once, until browned on both sides and chicken loses its pink color throughout (6-7 minutes). Transfer to platter; cover loosely with foil to keep warm.
  3. To same skillet, add mushrooms, shallot, and remaining 1/4 t salt. Cook, stirring frequently, until mushrooms are browned, 3 minutes. Add broth, wine, and any juices from platter; cook, stirring occasionally, until sauce is reduced by half* (about 4 minutes). Stir in parsley. To serve, spoon sauce over chicken. *if you want it thicker, you can add some corn starch mixed with water.
Serve with garlic mashed potatoes or over pasta or with rice.

220 calories
36g protein
4g carbs
5g fat
82mg cholesterol
470mg sodium

**if you have concerns about the cooking wine, just know that there is less alcohol in it than in vanilla (just sayin').

Thursday, February 9, 2012

Lemon Chicken Pasta and Peas

I know! PEAS! The truth is I like peas as long as they are still crisp and not mushy. I like peas as an ingredient but not as a side dish. I found this recipe in a recipe book I picked up (total impulse buy) at Sam's Club. It is the Good Housekeeping Fast Weeknight Favorites. So far I've been very pleased with the food and the "fast" aspect. Slow food is great but when I'm cooking for 1 and 1/4 (yes, Eden only counts for 1/4 of a normal eater) the payoff of slow, deliberate cooking just isn't there for me. Quick, easy, balanced meals are the way to go and this book seems to fit the bill for me right now.

Total Time: 30 minutes
Makes: 4 servings


  • 8 oz pasta (they suggest extra-wide egg noodles - I used chinese noodles because that is what I had)
  • 4 oz stringless sugar snap peas
  • 1 C shredded carrots
  • 1 C frozen peas
  • 1 C chicken broth
  • 1/2 C heavy or whipping cream (or in my case I have to use Soy Milk because of E's lactose issues)
  • 1 t freshly grated lemon peel (I think it could have used more)
  • 1/2 t coarsely ground black pepper
  • 1/2 t salt
  • 2 C skinless chicken meat–cubed


  1. In large sauce pot, cook noodles as label directs. Add snap peas to pot 1 minute before noodles are done.
  2. Place carrots and frozen peas in colander. Drain noodles and snap peas over carrots and peas.
  3. While noodle mixture drains, in same sauce pot, heat broth, cream, lemon peel, pepper, and salt to b oiling over high heat. 
  4. Add chicken and noodle mixture to sauce; heat through, stirring constantly.


Each serving: about 510 calories, 33 g protein, 52 g carbohydrate, 20 g total fat (9 g saturated), 158 mg cholesterol, 750 mg sodium.

Chicken, Tomato, Spinach and Tortellini Soup

I wanted soup the other day. We've recently discovered Eden is lactose intolerant and so I couldn't go to my stand-by of potato soup. I looked in the pantry and here is what I came up with:
  • 1 Can Chicken Broth
  • 1 Can Stewed Tomatoes
  • 1/2 C Chopped Chicken
  • 3/4 C uncooked Cheese-filled Tortellini
  • 1/2 C Fresh (or flash frozen) Spinach
  • Italian Herbs (I used thyme and basil) to taste
  • Pepper to taste (the broth and tomatoes both have plenty of sodium so you shouldn't need salt)
  • Shredded Mozzarella Cheese for on top (this is low in lactose so I used it, if you aren't dealing with LI issues you could use Parmesan)
  1. Put the broth and tomatoes in a pot and bring to a simmer. 
  2. Add herbs (dried or fresh) - you could also add garlic here.
  3. Add the chicken and tortellini. 
  4. One minute before the tortellini is cooked through add the spinach.
  5. Ladle into bowls and sprinkle cheese on top.
Serve with bread or biscuits and some fruit.

This is a beautiful soup with a hearty yet fresh taste–not heavy. I will definitely be making this again!

 (I really should get pictures of my food so I can show you but I'm always too busy devouring it to take a picture so you'll just have to take my word for it.)

Saturday, February 4, 2012

Eden Says: Style, Lactose, and Priorities

Ok, I know I've been MIA for a while. I just didn't feel like blogging. Maybe I still don't, but Eden has been pretty funny lately so I need to record a few things.

The scene: my bathroom, I'm getting ready for church and Eden is watching me.

Eden: Mom, when is your hair going to get its style back?
(I have now made an appointment and will be getting some style back this Friday)


**********

The background: we have discovered that Eden is extremely lactose intolerant. Even milk chocolate can cause her problems. After I made the discovery she had her wellness visit with the doctor. He really talked to her about taking responsibility for her own health. He told her that if she eats something with lactose it will be her tummy that hurts and so she needs to be the one to monitor it. She does a remarkable job (for a not-quite-four year old). She knows that her tummy doesn't have the enzymes to break down lactose and that is what causes the pain.

The scene: it is bedtime. We are in Eden's bed and I have read her three stories but she wants to hear a "real" story so I recite the story of her birth.

Eden: and then I wouldn't nurse!
Me: yup, why do you think that is? (usually she has said, "because I wanted my daddy to feed me")
Eden: well, I've been thinking about that and I think it is because I knew my tummy didn't have the em-signs for lactose so I didn't want to drink your milk.


************

The scene: we are at my parents' house. Eden is playing with her cousins and I am working on my dad's taxes (we call my dad, Punka).

Some things to know: 1) My mom has a treat jar and the kids get to choose a little toy or treat out of it if they do an act of service. Eden's favorite thing to do for Grammy is to wash windows. 2) Eden has become terrified of bees lately.

Eden: Mom! Will you come outside with me so I can wash the outside windows?
Me: I'm working on Punka's taxes. (I then turn my full attention to the computer while she says some things that I don't hear).
Eden: Mom! So, which do you think is MOST important, huh? which???
Me: Which what?
Eden: Do you think it is MOST important for you to do Punka's taxes or to make sure your daughter doesn't get stung by bees?

(obviously I joined her outside, standing guard against all bees and bee-like flying objects while she washed the outside window)

Saturday, December 17, 2011

Preschool: X is for eXercise

Last week was my turn to teach preschool again. W and X. For "W" we talked about "winter" and went on a winter wonderland walk. The weather cooperated and we got a nice dumping of snow over the weekend. That was fun. We talked about what happens to different kinds of plants and animals in the winter. We read books about winter. It was fun.

Then it was time to focus on "X" and so I told a story about how "X" was best friends with "E" and as long as they were together "X" was great. We talked about some "ex" words like "exciting" and "extra" and "exactly" etc. Then we spent the rest of the time talking about eXercise and why it is so important. We talked about how it helps our blood, breathing, muscles and bones. We talked about the right kinds of "fuel" for our eXercising machines (bodies). 

But mostly, we eXercised!

I made "snowballs" out of plastic bags wadded up and taped. Then they practiced throwing them at this big fat snowman. This was their favorite activity. We used these same snowballs to practice catching. I'd say their name and then throw to them so they could catch, then when they all had a snowball I'd say their name and they'd throw it back to me so I could catch. It really was a good eXercise.

Pushups. 

sit ups (did you know 4 year olds don't have the core strength or coordination to do sit ups? Well, at least these four didn't. It surprised me.)

ribbon dancing (probably the second favorite).


Balance beam

balance beam with "weights" (soup cans)
We also did yoga (cat, dog, and mountain poses), hiking (a pretend hike up the stairs), jumping (across a river - a blue rug), army crawls, jumping jacks, and a few others.

The time flew by and the kids loved it! I found most of my lesson plan ideas here. It is a great resource for getting your kids moving!

Thursday, December 8, 2011

Christmas Calendar (under $10)

I bought this shelf at Deseret Industries for $3. It was green, falling apart, had some bad repairs made to it, and was just ugly. Somehow I saw potential (but not enough confidence to have taken a before picture). I really love how this turned out. I spent $6 on the wood rectangles for the numbers but everything else I already had. I really love the subway tiles (stickers) on the sides. This is a project that actually turned out better than envisioned. I thought I'd buy number stickers but I couldn't find any that I liked and then I realized that I own a colored printer (duh!) and I could choose my own typeface and colors. I love how they turned out. I embellished with Christmas stickers I'd bought earlier and voila!


Monday, November 28, 2011

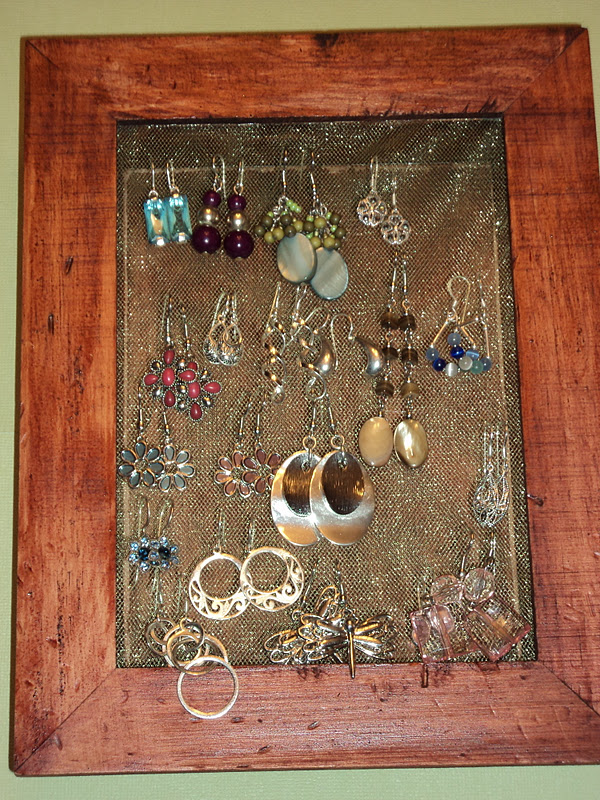
Project: Earring Holder/Display (for $3)

I've been needing a way to organize my earrings. I had seen plenty of examples of cute ways to display and organize fun earrings and I wanted to do something similar.

This is what I ended up doing:

I bought an unfinished picture box frame from the HobLob at 50% off making it $2.50. I removed the glass and distressed it a little. Then I stained it with some stain I already had.

After the stain dried, I used some of this netting and covered the picture box two or three times. I just used hot glue and made sure it was nice and tight. Then I put the frame part on with the fasteners it came with and voila!

It was fun placing all my dangling earrings in this. It is so much easier to find what I want to wear now. I'm quite happy with it!

Sunday, November 27, 2011

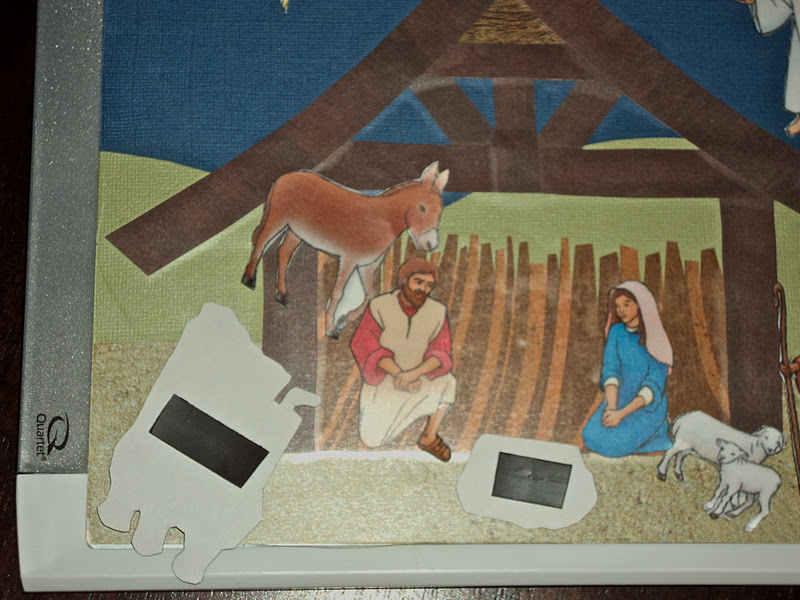
Magnetic Nativity Project - Easy and Fun

I wanted a nativity that Eden could play with and that would be durable, portable, and easy. This is what I came up with:

I bought this small (probably 6"x8") whiteboard for under $3:

Then, using craft paper I already had I made the background (blue sky, green hills, sandy ground):

I just used double stick tape to put it onto the whiteboard:

Again, using craft paper I already had, I made this simple stable. You could simplify it even more by leaving off the rafters:

Next I printed off these images. They can be found here. Then I covered the images with contact paper and cut them out:

I covered the stable/background with contact paper and placed magnetic tape (that I already had) on the back of the nativity images:

My total cost for this project (excluding items I already had) was less than $3. If I had purchased the magnetic tape and craft paper it still would have come in under $5. I have given some of these as gifts (and plan to do some more). Eden took hers to church last week and it was a great quiet Christ-centered activity for her to do during the talks.

Monday, November 14, 2011

Mind your "Ps" and "Qs"

It was my turn to teach preschool again and this time we had "P" and "Q."

For the letter "P" we mostly talked about painting. I showed them some of Phil's art books and we discussed the difference between various styles and mediums (without any technical language). Not surprisingly, they all liked the more realistic paintings and water colors the best.

Next, I set up four stations (because we have four kids in our preschool). Each child got to spend time at each station. The stations were:

  1. Painting with brushes and a large piece of paper.
  2. Finger painting.
  3. Traditional water paints.
  4. Water paint pencils.
The kids had lots of fun and they were mostly clean at the end.

We also talked a little about pennies and I had them count pennies and then we used flash cards to pick a number and they counted out that number of pennies.

After the other kids went home, Eden continued to paint. She loved the water colors and started to really do some interesting things. She spent much time over the next several days painting. Phil would be so proud.

For the letter "Q" we did the following:
  • We told a story about how "Q" always wanted a best friend and then when he met "U" he realized he'd found one and decided that they would always stick together. The children took turns re-telling the story and then they took turns being "Q" and "U" and following each other around the room.
  • We made crustless Quiche. (3 eggs, 1/3 C Ricotta Cheese, 1/3 C Shredded Colby, 1/3 C Milk; blend in blender; pour into ramekins; bake at 400 degrees for 15 minutes). The kids each got to choose what extras (bacon bits, spinach, etc.) to add to their quiche. When they were done, we ate them and Nestle Quick for snack.

  • We made Quilts. We used sticky-backed craft foam of various shapes and each child got to design their own quilt. I was surprised at how much they enjoyed this activity. Even the boys really got into it.

  • We sorted coins in order to find the Quarters. Then we did various counting and number games using the quarters.

Tuesday, November 8, 2011

Monday, November 7, 2011

Thanks-giving FHE

Yesterday we had a great lesson in RS about the importance of gratitude. I've been seeing all the November-is-grateful-month posts on FB but haven't felt inclined to join in. The lesson, though, reminded me that it is never a bad time to get on the grateful bandwagon. So, for FHE tonight, I brought back one of our favorite November rituals. Phil and I started this three years ago. It has taken slightly different forms but has kept its original intent and purpose.

Behold the Thanks-giving Turkey:


Every night from tonight until Thanksgiving we will add a feather of gratitude to this little Turkey. He looks pretty bare right now, but just you wait!

Eden and I talked about the importance of gratitude. I asked her why it is good to say "thank you" and she said, "because then you'll probably get more stuff!" Clearly, I have some work to do.

Yesterday in the RS lesson there was a quote that said, "What if you woke up today with only the things you thanked Heavenly Father for yesterday?" I used that concept and said to Eden, "what if I took back everything except the things you have thanked me for?" She replied, "I'd be really, really mad." We talked about it and then I said, "what if Heavenly Father took back everything except what we thanked him for yesterday? Did you thank Him for our house? Did you thank Him for your mom?" etc. She realized she would have food and that is about it, no house or mom or toys or friends. I think her prayer tonight was the first time she's ever thanked Him for her mommy. Nice!

She is so excited to add feathers to our bare little bird. I told her that she needs to be thinking through out the day so that she'll know what to put on the feather each night.

I'm thankful for a great lesson yesterday and the inspiration to bring back the Thanks-giving Turkey.

To make the turkey I bought a piece of foam-core at the dollar store. I used brown wrapping paper to cut out the body (just a basic pear-like shape). I cut a triangle beak and red for that floppy thing (Layne can tell us in the comments what that is called). His eyes are just white paper and blue paper with accents from a black marker. His legs are from scraps of orange paper. I cut out feathers from a variety of colors. It is all pretty basic but makes a cute bird in my humble opinion. In past years we have done individual birds (that were smaller) and the first year we used a pumpkin for the body and I just cut out a head and feathers that we pinned onto it. The problem is that the pumpkin didn't quite make it to Thanksgiving.


Glossary: 
FHE - Family Home Evening, a family night held once a week (usually on Mondays) in Latter-day Saint homes. Ours follows this basic pattern: song, prayer, flag salute, "Kesler Kudos" (a time to thank one another), lesson (brief), activity, treats, prayer.


RS - Relief Society, the women's organization within the Church of Jesus Christ of Latter-day Saints. It is the largest women's organization in the world.


FB - Facebook (but I'm guessing you already knew that!) :)

Monday, October 24, 2011

Spudnuts

Every Halloween, my mom makes a bunch of doughnuts and all her neighbors flock to her house. She has candy for the kids (silly kids, choosing candy over spudnuts!) but the adults get a warm doughnut. I made them this past weekend and thought I'd share the recipe.

This makes over 100 doughnuts but you can half or even quarter it.

Ingredients

  • 4 1/2 C Water
  • 1 1/2 t Salt
  • 1 C Margarine (or butter)
  • 5 Eggs (if halfing, my mom suggests using 3 eggs)
  • 1 C Sugar
  • 2 C Mashed Potatoes (left overs are fine as long as you didn't add garlic or ranch to them)
  • 2 t Nutmeg
  • 14 C Flour
Instructions
  1. In small bowl, mix 1/2 C water, 2 T yeast, and 1 t sugar. Let brew.
  2. In large bowl (as in HUGE) mix 4 C water, salt, margarine, eggs, sugar, mashed potatoes, nutmeg.
  3. Add yeast mixture and mix with a wire wisp. Add flour and mix with a wooden spoon until all flour is moist.
  4. Let rise in bowl until double (approx. 1 1/2 hours)
  5. Roll our and cut into doughnuts or bars and let rise again until double (approx. 1 1/2 hours)
  6. Deep fry in very hot oil. Place the side that was up while rising in the oil first, then turn..
  7. Glaze, eat!
Glaze Recipe
  1. Mix 4 C powdered sugar with enough milk to make a glaze (not frosting), mix with a wire wisp.
Plan on starting these about 4-5 hours before you want to eat them. While they are time intensive, most of that time is rising so you aren't actually working on them.

We made ours pumpkin shaped. They didn't keep their shape too well in the rising/frying process.
Deep frying - be careful!
We added orange food dye to our glaze since we made "pumpkins"
These were yummy. We're glad we had the Voice Male gang here to help us eat them!

Wednesday, October 5, 2011

H is for Halloween (of course!)

Today in preschool we worked on the letter H. Whereas Monday was a science day, today was definitely an arts and crafts day.

We painted sugar cookie pumpkins. (Recipes below)

We read this book and each child got a set of 10 Timid Ghosts

We read this story and then they drew something from the story. Left to right: The mailman, Marley, the pumpkin. Not bad for 4 year olds!

We made foot print ghosts. They didn't turn out as well as I'd hoped (their arches were too high, I guess). Next time I think I'll use the bottom of a flip flop to stamp out the ghost shape (heel is the head).


We talked about shapes and then they got to design their own Jack-o-lanterns.

See how cute!


We sewed these hand puppets. This one is a witch in the making.

This one is a kitty. (These were from a kit I bought at the HobLob.)

Maybe my favorite project is one we didn't even get to. So, Eden and I did them after preschool. These are inkblot monsters. We painted one side, folded it over, rubbed it, opened it up, then put on eyes, etc. Aren't these hilarious? We have about five more that Eden did this afternoon. Truly fun and funny.


I love teaching preschool once a month. I get so excited to prepare for the week I get to teach, but let me tell you, I'm also so excited when my week is done and I know I won't be teaching again for a month! This is definitely a nice set up we have, it suits me just perfectly.

Recipe for sugar cookies found here.
The glaze is just powdered sugar and milk to a paint-like consistency then add your food coloring. Using the paint brushes is ingenious and so fun. Every fall when we do these I think of my friend Natalie back in Alabama. She is the painted sugar cookie queen.

Tuesday, October 4, 2011

G is for Glass and that rhymes with Grass

Yesterday for preschool we talked about the letter G. I wanted the focus to be on science and so we did some chemistry and biology. Specifically, we learned about how Glass is made and we learned about Grass.

Glass
I showed them this video:


I wondered if they'd be able to follow it but with some running commentary/explanation by me they were and seemed to think it was fascinating!

Then we made glass for ourselves (with a few substitutions).

Sand - Sugar
Soda Ash - Water (lowers the melting temperature)
Lime - Corn Syrup (stabilizes and makes less soluble)
2400 degrees - 350 degrees
8 hours - 20 minutes

Yup, we made suckers. It was a great parallel to glass making and the kids watched with great interest and enthusiasm.


See how it balls up just like the real glass?


They each got to take home a "glass" sucker and they were pretty excited.

Yesterday was our last day of summer weather (I know, we've been spoiled) so I wanted to get the kids outside as much as possible before today's fall-like rain began. So, we also learned about Grass.

We planted and watered grass seeds and talked about the life cycle of grass. I had a puzzle for each of them to correctly assemble the life cycle from seed to grass blades. 
We went outside and used our magnifying glass to look at the grass and all that was in it: bugs, dirt, etc. Then they drew pictures in their notebooks.

Tuesday, September 27, 2011

Autumn Time

Eden has been begging me to get out the fall decorations. I finally acquiesced.
Eden's Scarecrow

Eden's Witch

I made this last night. I have to say, I love it! Comparable wreaths at the HobLob were between $80-120. I made this for less than $20. It took about two hours. The first hour was just cutting the leaves and flowers off their stems. The second hour was hot gluing. I think it looks so pretty on my green door.

Dollar Store lanterns.

This guy was on the outside of our door last year but he kept getting blown away so he gets to stay inside this year.

Eden's decorations from last year.

The mantel. This year we have some dragonfly lights. We like dragonflies, they remind us of Phil.

Piano 

I made these pumpkins two years ago (in AL) out of old Phil shirts (even the leaves). We like them.

More art by Eden.

Eden made these creepy critters on Sunday.